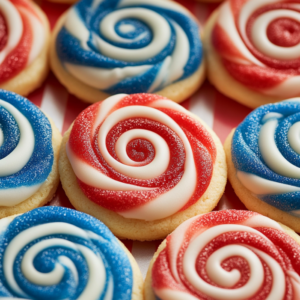
Red, White, and Blue Pinwheel Icebox Cookies
Jump to Recipe
When summer rolls around, and you’re planning those backyard barbecues or festive picnics, these Red, White, and Blue Pinwheel Icebox Cookies are here to steal the show. With their vibrant swirls and buttery, melt-in-your-mouth texture, these cookies are as fun to eat as they are to look at. Whether you’re celebrating the 4th of July, Memorial Day, or Labor Day, these cookies bring the perfect pop of patriotic flair to your dessert table.
The best part? They’re make-ahead friendly! You can prep the dough days (or even weeks) in advance, freeze it, and bake when you’re ready. No stress, no mess—just stunning cookies that taste as good as they look. Let’s dive into this fun, colorful baking adventure together!
Why You’ll Love These Pinwheel Icebox Cookies
- Show-Stopping Design: The bold red, white, and blue swirls are guaranteed to wow your guests.
- Make-Ahead Ease: Prep the dough ahead of time and bake fresh cookies whenever you need them.
- Beginner-Friendly: No fancy tools or cookie cutters required—just roll, slice, and bake!
- Customizable: Swap the colors, add flavors, or experiment with sprinkles for a twist on the classic.
- Perfect for Gifting: Stack them in jars or wrap them up for festive party favors.
Ingredients You’ll Need
For the Cookie Dough:
- 2 ½ cups (315g) all-purpose flour
- ½ tsp baking powder
- ½ tsp fine salt
- 1 cup (226g) unsalted butter (softened)
- 1 cup (200g) granulated sugar
- 1 large egg
- 1 tsp vanilla extract
- Red gel food coloring
- Blue gel food coloring
Optional for Decorating:
- Sanding sugar or sprinkles for rolling edges
- Clear sanding sugar for sparkle
- White chocolate drizzle or glaze
Tools You’ll Need
- Stand mixer or hand mixer
- Mixing bowls
- Measuring cups and spoons
- Food-safe gloves (to avoid food coloring stains)
- Rolling pin
- Parchment paper or plastic wrap
- Sharp knife or serrated blade
- Baking sheets
- Cooling rack
How to Make Red, White, and Blue Pinwheel Icebox Cookies
Step 1: Make the Base Dough
- In a medium bowl, whisk together the flour, baking powder, and salt. Set aside.
- In a large mixing bowl, beat the softened butter and sugar until light and fluffy (about 2–3 minutes). Add the egg and vanilla extract, mixing until combined.
- Gradually add the dry ingredients to the wet ingredients, mixing just until a soft dough forms. Be careful not to overmix.
Step 2: Divide and Tint the Dough
- Divide the dough into three equal portions:
- Leave one portion plain (white).
- Mix red gel food coloring into the second portion.
- Mix blue gel food coloring into the third portion.
- Use food-safe gloves to avoid staining your hands, and mix each color thoroughly. Wrap each portion in plastic wrap and refrigerate for 30–45 minutes, or until slightly firm.
Step 3: Roll and Layer
- Roll out the blue dough on a piece of parchment paper into a rectangle about 9×12 inches. Repeat with the white dough and then the red dough. Try to keep the layers as even as possible.
- Carefully stack the layers: blue on the bottom, white in the middle, and red on top. Lightly press the layers together and trim the edges for a clean, neat rectangle.
Step 4: Roll Into a Log
- Starting from one long edge, use the parchment paper to help you tightly roll the dough into a log. Wrap the log in parchment or plastic wrap and chill for at least 2 hours, or freeze for up to 3 months.
- Optional: Roll the outside of the log in sanding sugar or sprinkles for extra sparkle and texture.
Step 5: Slice and Bake
- Preheat your oven to 350°F (175°C) and line baking sheets with parchment paper.
- Slice the chilled dough log into ¼-inch rounds using a sharp knife. Place the cookies 2 inches apart on the prepared sheets.
- Bake for 9–11 minutes, or until the edges are just barely golden. Let the cookies cool on the pan for 5 minutes before transferring to a wire rack.
Tips for Success
- Chill the Dough: Cold dough is easier to slice and helps the cookies maintain their shape.
- Use Gel Food Coloring: Gel colors are vibrant and won’t alter the dough’s texture like liquid coloring can.
- Roll Evenly: Keep the dough layers as uniform as possible for neat, tight swirls.
- Slice with Precision: Use a sharp knife or serrated blade for clean, even slices.
- Don’t Overbake: The cookies should be just set and slightly golden at the edges.
Make-Ahead and Storage Tips
- Dough Logs: Store wrapped in plastic for up to 3 days in the fridge or 3 months in the freezer.
- Sliced Dough: Freeze slices between parchment layers in an airtight container. Bake directly from frozen—just add 1 extra minute to the bake time.
- Baked Cookies: Store in an airtight container at room temperature for up to 1 week. These cookies also ship well for gifting!
Fun Variations and Flavor Twists
- Flavor Extracts: Swap vanilla for almond, lemon, or peppermint extract.
- Chocolate Swirl: Replace ¼ cup of the flour with cocoa powder for a chocolatey twist.
- Rainbow Pinwheels: Use 5–6 colors for a fun, multicolored version.
- Marbled Effect: Instead of layering, swirl the colored doughs together for a marbled look.
Decorating Ideas
- White Chocolate Drizzle: Drizzle cooled cookies with melted white chocolate for a sweet finish.
- Sprinkles Galore: Add patriotic sprinkles or edible glitter for extra flair.
- Simple and Classic: Let the swirls shine on their own—no extra decoration needed!
FAQs
Q: Can I use liquid food coloring?
- It’s not recommended. Liquid coloring can make the dough too soft and affect the texture. Stick with gel or paste for vibrant results.
Q: How do I keep the layers neat?
- Trim the edges after rolling each layer, and use parchment paper to guide the dough as you roll it into a log.
Q: Can I make these gluten-free?
- Yes! Substitute the all-purpose flour with a 1:1 gluten-free baking blend. Chill the dough slightly longer before rolling to ensure it’s firm enough to handle.
Q: How do I get tight, even swirls?
- Roll the dough tightly and evenly, applying gentle pressure as you go. Chill thoroughly before slicing for clean edges.
Final Thoughts
These Red, White, and Blue Pinwheel Icebox Cookies are more than just a dessert—they’re a celebration in cookie form! With their bold colors and buttery texture, they’re guaranteed to be the star of your summer gatherings.
What’s even better? The prep-ahead convenience means you can spend less time in the kitchen and more time enjoying the festivities. So, whip up a batch (or two), share them with friends and family, and let the compliments roll in. These cookies are the perfect way to add a little sparkle to your summer celebrations! 🎆🍪