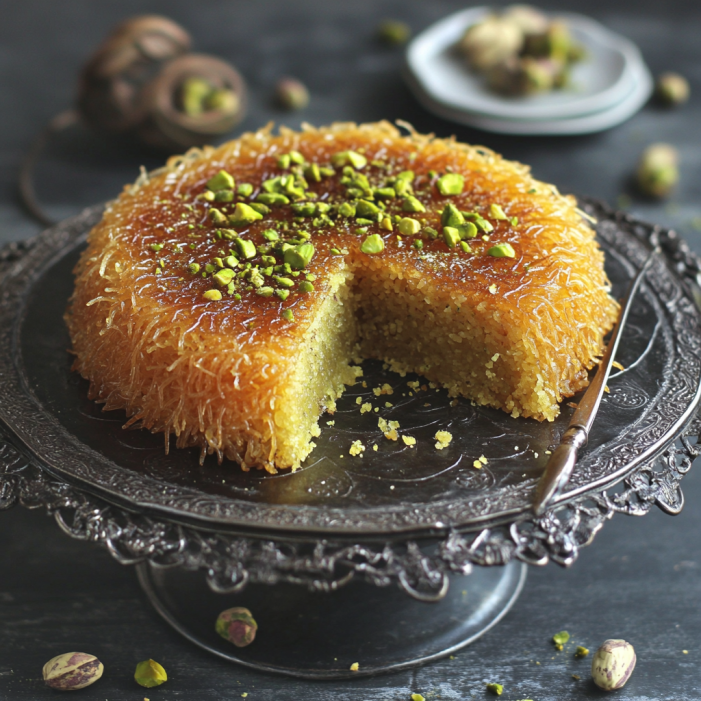
Kunafa: A Middle Eastern Cheese Pastry Delight
Have you ever savored a dessert that tantalizes your taste buds with a symphony of flavors and textures? Kunafa, the exquisite Middle Eastern cheese pastry, is just that! Picture crispy, golden strands of dough enveloping warm, gooey cheese, all drizzled with fragrant syrup. This dish is more than just a dessert; it’s a joyous experience that elevates any gathering.
Whether you’re celebrating a special occasion or simply treating yourself at home, this decadent pastry is sure to impress everyone at your table. The delightful contrast between the crunchy exterior and the creamy filling creates an unforgettable bite. Let’s explore why you’ll love making this culinary masterpiece!
Why You’ll Adore This Kunafa
Authentic Flavor Experience: The unique combination of crispy dough and melted cheese creates a harmonious balance that captivates the senses. Each bite offers a delightful contrast between the sweetness of the syrup and the savory notes of the cheese.
Perfect for Celebrations: Kunafa is often served during festive occasions and family gatherings in Middle Eastern cultures. Its rich flavor and stunning presentation make it an ideal centerpiece for any celebration.
Simple to Prepare: Despite its impressive appearance, making Kunafa at home is straightforward. With just a few ingredients and easy-to-follow steps, you can create this delicious dessert without any fuss.
Versatile Serving Options: Enjoy Kunafa warm or cold, making it suitable for any time of day. Pair it with ice cream or fresh fruit for an extra special touch that enhances its already indulgent nature.
Ingredients
To whip up this delightful dish, you’ll need:
- Kunafa Dough: Look for fine shredded phyllo dough at your local grocery store or Middle Eastern market; it provides that signature crispiness.
- Unsalted Butter: High-quality unsalted butter ensures you control the saltiness in your dish while adding richness.
- Ricotta Cheese: Fresh ricotta is key for its creamy texture; it melts beautifully inside the kunafa.
- Mozzarella Cheese: Shredded mozzarella gives that stretchy consistency that contrasts nicely with the crisp outer layer.
For the Syrup:
- Sugar: Regular granulated sugar works best for creating a perfectly sweet syrup.
- Water: Use filtered water for a cleaner flavor when making your syrup.
- Rose Water or Orange Blossom Water: These fragrant waters add an aromatic finish to your syrup.
How to Make Kunafa
Follow these simple steps to prepare this delicious dish:
- Preheat Your Oven: Preheat your oven to 350°F (175°C). Ensure your oven racks are positioned in the center for even cooking.
- Prepare Your Baking Dish: Grease a large baking dish with melted butter to prevent sticking. This also adds extra flavor to the crust.
- Mix Cheeses Together: In a bowl, combine equal parts ricotta and mozzarella cheese. Stir thoroughly until well-blended; set aside while preparing the kunafa dough.
- Layer the Dough: Take half the kunafa dough and shred it into smaller pieces if necessary. Spread half of it evenly across the bottom of your prepared baking dish. Drizzle generously with melted butter before adding the cheese mixture on top.
- Add Remaining Dough: Layer the remaining kunafa dough over the cheese mixture, pressing down gently. Pour more melted butter evenly across this top layer to achieve maximum crispiness when baked.
- Bake Until Golden Brown: Place your assembled kunafa in the preheated oven and bake for about 30-40 minutes or until golden brown on top. Keep an eye on it as ovens may vary!
- Serve: Transfer to plates and drizzle with syrup for the perfect finishing touch.
Tips and Tricks
- Use Fresh Ingredients: Fresh cheeses yield better flavors and textures. Always opt for fresh ricotta and mozzarella whenever possible.
- Monitor Baking Time Carefully: Every oven behaves differently; check your kunafa frequently towards the end of baking to avoid burning.
- Allow It to Rest Before Serving: Letting kunafa sit for about 10 minutes after baking helps set its layers, making slicing easier without losing its structure.
- Add Toppings for Extra Flavor: Consider garnishing with crushed pistachios or walnuts before serving to introduce additional texture and flavor contrast.
Common Mistakes to Avoid
- Not Using Fresh Ingredients: Always check the freshness of your cheese, dough, and other components. Fresh ingredients are crucial for the best flavor and texture.
- Skipping the Soaking Syrup: Soaking your kunafa in syrup is essential for achieving the perfect balance of sweetness. Prepare a simple syrup using equal parts sugar and water, flavored with a hint of lemon juice or rose water for added depth.
- Piling on Too Much Filling: Finding the right balance is key. Aim for a moderate layer of cheese between the kunafa strands—about half an inch is ideal.
- Neglecting Proper Baking Temperature: Preheat your oven to 350°F (175°C) for that perfect golden-brown crust. Monitor closely to avoid undercooking or burning.
Serving Suggestions
This Kunafa is versatile and pairs wonderfully with a variety of accompaniments. Serve it alongside a scoop of vanilla ice cream for a delightful contrast to the warm, gooey pastry. A drizzle of honey or a sprinkle of pistachios adds sweetness and a crunchy texture.
For a traditional touch, pair Kunafa with Arabic coffee or mint tea, enhancing the dessert’s rich flavors. Fresh fruits like strawberries or raspberries also brighten each bite, cutting through the richness and adding a refreshing burst.
FAQs
- What is Kunafa?
- How do I store leftover Kunafa?
- Can I make Kunafa ahead of time?
- What toppings go well with Kunafa?
Conclusion
Kunafa is not just a delightful treat; it’s a cultural icon that brings people together over sweet flavors and shared experiences. This dessert features layers of crispy pastry filled with melted cheese or custard, then soaked in syrup for added richness. Whether enjoyed alone or shared with loved ones during celebrations, Kunafa remains a cherished delicacy that continues to captivate dessert lovers worldwide. So, roll up your sleeves and dive into this culinary adventure—you won’t regret it!