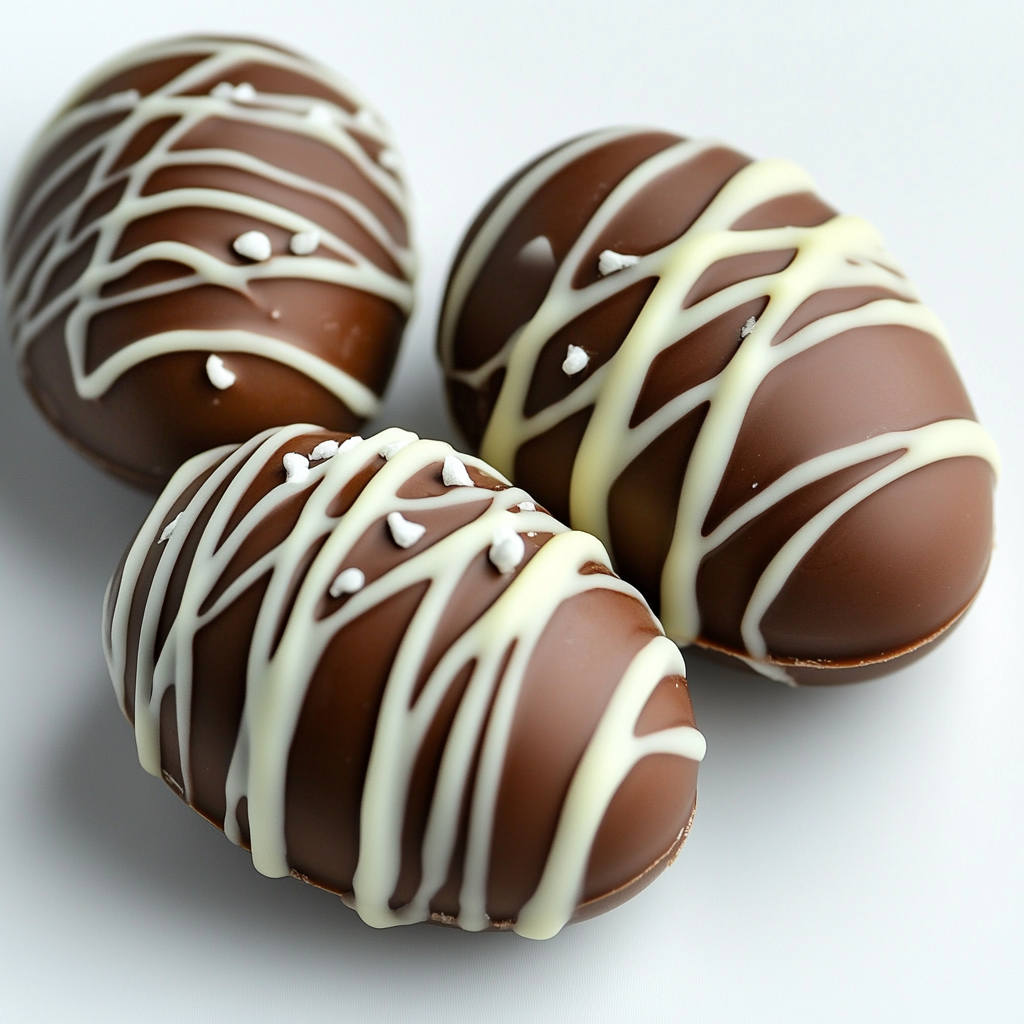
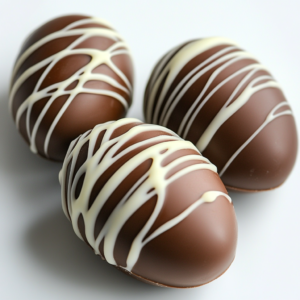
Fudge-Filled Easter Eggs
Jump to Recipe
Get ready to indulge in a delightful spring treat with these Fudge-Filled Easter Eggs! These homemade goodies are a heavenly combination of creamy milk chocolate fudge centers encased in smooth chocolate shells. Shaped like traditional Easter eggs, each one is dipped in either white or milk chocolate and finished with decorative drizzles for a festive touch. These treats are perfect for preparing ahead of time, require just a handful of simple ingredients, and store beautifully at room temperature. Customize them with dark chocolate or vibrant candy melts for an extra pop of color. They’re ideal for gifting, entertaining, or simply enjoying during the Easter celebrations!
Why You’ll Love This Recipe
- Perfect for Celebrations: A festive addition to any Easter gathering or springtime celebration.
- No Special Equipment Needed: Just your basic kitchen tools will do!
- Make-Ahead Friendly: Prepare them in advance for stress-free holiday prep.
- Customizable: Switch up the chocolate varieties to suit your taste.
I first whipped up these fudge-filled eggs as a healthier alternative to store-bought Easter candy when my kids were little. Now, they’ve become a cherished tradition that my grown children still request whenever they visit in the spring!
Ingredients
For the Chocolate Base:
- 4½ cups milk chocolate chips (divided)
- 14 ounces sweetened condensed milk (396g)
- 2 teaspoons vanilla extract
For Decoration:
- 1½ cups white chocolate chips
Step-by-Step Instructions
1. Prepare the Fudge Mixture
In a large microwave-safe bowl, combine 3 cups of milk chocolate chips, sweetened condensed milk, and vanilla extract. Microwave at half power for 1 minute, then stir. Continue microwaving in 30-second intervals, stirring between each, until the mixture is completely smooth and glossy.
2. Form the Egg Shapes
Let the fudge mixture cool slightly for about 3-4 minutes until it’s firm enough to handle but still pliable. Using a 1½ tablespoon scoop, portion out balls of fudge onto a parchment-lined baking sheet. With slightly damp hands, gently shape each portion into an egg form, pressing and smoothing the sides. Work quickly, as the fudge will become harder to shape as it cools.
3. Chill the Fudge Eggs
Place the shaped fudge eggs in the refrigerator until they’re completely firm, about 30 minutes. This step is crucial because soft fudge will fall apart when dipped in warm chocolate. The eggs should feel cold and solid to the touch before moving on.
4. Prepare the Chocolate Coatings
Melt the remaining 1½ cups of milk chocolate chips in one microwave-safe bowl, and the white chocolate chips in another. Heat each in 30-second intervals, stirring in between until smooth. Be careful not to overheat the white chocolate, as it can burn more easily than milk chocolate. Both melted chocolates should be smooth and have a pourable consistency.
5. Dip and Coat the Eggs
Working with one fudge egg at a time (keeping the others refrigerated), drop it into either the melted milk or white chocolate. Use a fork to fully submerge it, then lift it out, letting excess chocolate drip back into the bowl. Gently tap the fork against the bowl’s edge to remove more excess chocolate. Slide the coated egg onto a fresh piece of parchment paper. The cold fudge will help the chocolate set quickly.
6. Add Decorative Drizzles
Once the base coating has set up but before it’s completely hardened, drizzle the opposite chocolate over the eggs. If you coated an egg in milk chocolate, drizzle it with white chocolate, and vice versa. Use a small spoon or fork to create delicate lines across the eggs. Allow the chocolate to set completely at room temperature.
Storage Success
These fudge-filled eggs will keep beautifully at room temperature for up to one week when stored in an airtight container. Layer them between pieces of parchment paper to prevent sticking. They actually taste best at room temperature, as the fudge center maintains its creamy texture. If your home is particularly warm, you may prefer to store them in the refrigerator—just allow them to come to room temperature before serving.
Flavor Variations
While the classic milk chocolate and white chocolate combination is perfect for Easter, you can easily customize these treats:
- Dark Chocolate: Swap in dark chocolate chips for a more sophisticated flavor.
- Flavor Extracts: Add mint extract for a refreshing chocolate mint egg, or almond extract for a delightful twist.
- Pastel Colors: Add a few drops of food coloring to the white chocolate to create pastel-colored eggs that match your Easter decor.
Gifting Ideas
These homemade fudge eggs make wonderful gifts for teachers, neighbors, or family members. Place a few eggs in a cellophane bag tied with a pretty ribbon, or arrange them in a small Easter basket with some tissue paper grass. I love creating little personalized tags explaining what they are. The handmade touch always means so much more than store-bought candy, and recipients are always impressed by the professional-looking results.
Tips for Success
- Work in Batches: Keep most of the fudge eggs in the refrigerator while dipping only a few at a time to prevent them from softening.
- Reheat Chocolate if Needed: If the melted chocolate begins to thicken while dipping, reheat it briefly in the microwave for 10 to 15 seconds.
- Add Coconut Oil: For a smoother finish, add a teaspoon of coconut oil or shortening to your melting chocolate. This creates a thinner coating that sets with a beautiful shine.
These fudge-filled Easter eggs are sure to become the highlight of your celebrations, cherished by kids and adults alike!
Frequently Asked Questions
Q: How long do these chocolate fudge eggs stay fresh?
A: When stored in an airtight container at room temperature, these fudge-filled Easter eggs will stay fresh for up to one week. There’s no need to refrigerate them after they’ve fully set.
Q: Can I use dark chocolate instead of milk chocolate?
A: Absolutely! You can substitute dark chocolate chips for the milk chocolate for a less sweet, more intense chocolate flavor. You might want to add an extra tablespoon of sweetened condensed milk since dark chocolate is less sweet.
Q: What’s the best way to shape the fudge into eggs?
A: After scooping the slightly cooled fudge, gently roll it into a ball, then pinch one end slightly to create the classic egg shape. Working quickly while the fudge is still pliable makes shaping easier.
Q: How can I add color to these Easter eggs?
A: To add festive colors, consider using colored candy melts instead of white chocolate, or mix a small amount of oil-based food coloring into the white chocolate before dipping or drizzling. Avoid water-based food coloring, as it can cause the chocolate to seize.
Q: What tools work best for dipping the eggs in chocolate?
A: A fork works well for dipping, but a specialized chocolate dipping tool or spiral dipper can give even better results. After dipping, gently tap the tool against the bowl’s edge to remove excess chocolate and create a smoother coating.
Q: Can I make these eggs ahead of time?
A: Yes! These eggs can be made 1-2 weeks ahead of Easter. Make sure they’re completely set, then store them in a single layer in an airtight container at a cool room temperature. Avoid refrigeration, as it can cause condensation that affects the chocolate’s appearance.
Tools You’ll Need
- Microwave-safe bowls
- Parchment paper
- Baking sheet
- 1½ tablespoon scoop or measuring spoon
- Fork for dipping
Allergy Information
Please check all ingredients for potential allergens and consult a health professional if in doubt.
Nutrition Facts (Per Serving)
Keep in mind that the nutritional information is approximate and should not be used as definitive health advice.
Get ready to delight in these Fudge-Filled Easter Eggs—they’re sure to be a hit at your spring gatherings! 🐣🍫