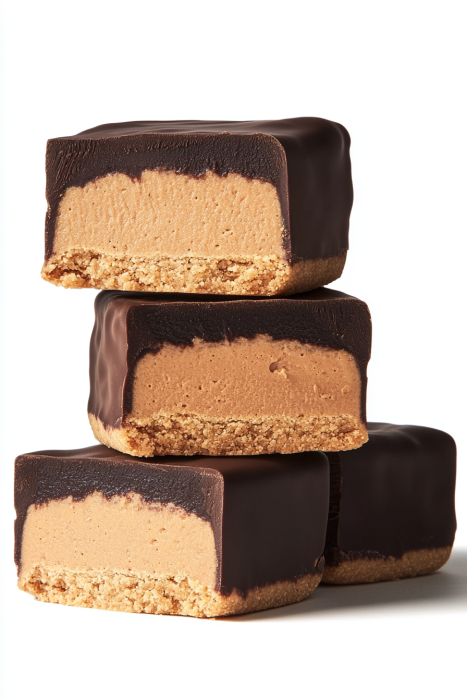
Chocolate Peanut Butter Balls with Rice Krispies
Get ready to fall in love with these Chocolate Peanut Butter Balls with Rice Krispies—a no-bake treat that’s as easy to make as it is delicious! These bite-sized delights combine creamy peanut butter, the satisfying crunch of Rice Krispies, and a decadent chocolate coating for a dessert that’s perfect for any occasion. Whether you’re whipping them up for a holiday party, a cookie exchange, or just to satisfy your sweet tooth, these treats are guaranteed to be a hit.
Why You’ll Love This Recipe
- Quick & Easy: With minimal prep time and no baking required, these are perfect for busy days.
- Crowd-Pleasing Flavor: Who can resist the classic combo of chocolate and peanut butter?
- Fun to Make: Kids and adults alike will enjoy rolling the balls and dipping them in chocolate.
- Customizable: Add your favorite toppings or switch up the chocolate for a personal twist.
- Perfect for Any Occasion: From holiday gatherings to casual snacking, these treats fit the bill.
I’ve made these countless times for everything from school bake sales to family movie nights, and they never disappoint. My kids love helping out, and we always end up sneaking a few before the chocolate sets. Trust me—these are the kind of treats that disappear fast!
Ingredients
Here’s what you’ll need to make these irresistible treats:
- 2 cups creamy peanut butter
- ½ cup unsalted butter, softened
- 3 cups powdered sugar
- 1 teaspoon vanilla extract
- 2 cups Rice Krispies cereal
- 16 ounces chocolate candy coating (such as Ghirardelli melting wafers)
- ¼ cup chopped peanuts (optional, for garnish)

How to Make Chocolate Peanut Butter Balls with Rice Krispies
Step 1: Make the Peanut Butter Mixture
- In a large mixing bowl, combine the peanut butter and softened butter. Mix until smooth and creamy.
- Gradually add the powdered sugar and vanilla extract, stirring until the mixture forms a thick, dough-like consistency.
Step 2: Add the Crunch
- Gently fold in the Rice Krispies cereal, making sure it’s evenly distributed throughout the mixture.
Step 3: Roll the Balls
- Scoop out about 1 tablespoon of the mixture and roll it into a ball. Repeat with the remaining mixture.
- Place the balls on a parchment-lined baking sheet, leaving a little space between each one.
Step 4: Chill
- Refrigerate the peanut butter balls for at least 30 minutes. This helps them firm up and makes them easier to coat in chocolate.
Step 5: Melt the Chocolate
- Melt the chocolate candy coating according to the package instructions. Stir until smooth and glossy.
Step 6: Dip the Balls
- Using a fork or dipping tool, dip each chilled ball into the melted chocolate, ensuring it’s fully coated.
- Let any excess chocolate drip off before placing the ball back onto the parchment paper.
- If desired, sprinkle with chopped peanuts while the chocolate is still wet.
Step 7: Set and Serve
- Allow the chocolate to set completely at room temperature or in the refrigerator.
- Once the chocolate is firm, your peanut butter balls are ready to enjoy!
Pro Tips for Perfect Peanut Butter Balls
- Chill for Success: Don’t skip the chilling step—it ensures the balls hold their shape during dipping.
- Use Quality Ingredients: High-quality peanut butter and chocolate make all the difference in flavor.
- Tidy Dipping: Use a fork to dip the balls and tap it gently on the edge of the bowl to remove excess chocolate.
- Switch It Up: Try using dark, milk, or white chocolate for variety, or drizzle a contrasting chocolate on top for decoration.
- Storage Matters: Store the balls in an airtight container to keep them fresh and delicious.
Make-Ahead and Storage Tips
Make-Ahead:
- These treats can be made several days in advance and stored in the refrigerator until you’re ready to serve.
Storing Leftovers:
- Store the peanut butter balls in an airtight container in the refrigerator for up to 2 weeks.
Freezing:
- For longer storage, freeze the balls in a single layer on a baking sheet. Once frozen, transfer them to a freezer-safe container or bag. They’ll keep for up to 3 months. Thaw in the refrigerator before serving.
Flavor Variations
Want to put your own spin on these classic treats? Here are some fun ideas:
- Add a Crunchy Coating: Roll the balls in crushed pretzels, graham crackers, or sprinkles before dipping them in chocolate.
- Mix-Ins: Stir in mini chocolate chips, toffee bits, or chopped dried fruit for added texture and flavor.
- Nut Butter Swap: Use almond butter or cashew butter instead of peanut butter for a unique twist.
- Holiday Flair: Use colored sprinkles or drizzle with festive-colored chocolate for a seasonal touch.
Serving Suggestions
These Chocolate Peanut Butter Balls with Rice Krispies are perfect for:
- Holiday Platters: Add them to your cookie trays or dessert spreads.
- Gift Giving: Package them in decorative boxes or bags for a sweet homemade gift.
- Party Snacks: Serve them alongside other bite-sized treats for an easy dessert option.
- Everyday Indulgence: Keep a stash in the fridge for when those chocolate cravings hit!
FAQs
1. Can I use natural peanut butter?
Yes, but make sure it’s well-stirred and not too oily, as this can affect the texture of the mixture.
2. What if I don’t have candy coating?
You can use melted chocolate chips with a teaspoon of coconut oil or shortening to help it set smoothly.
3. Can I make these nut-free?
Absolutely! Substitute the peanut butter with sunflower seed butter or another nut-free alternative.
4. How do I prevent the Rice Krispies from getting soggy?
Fold them in gently and avoid overmixing to maintain their crunch.
5. Why is my chocolate coating cracking?
If the balls are too cold when dipped, the chocolate may crack as it sets. Let them sit at room temperature for a few minutes before dipping.
Conclusion
These Chocolate Peanut Butter Balls with Rice Krispies are a true crowd-pleaser, combining creamy peanut butter, crispy cereal, and rich chocolate into one irresistible bite. Whether you’re making them for a special occasion or just because, they’re sure to delight everyone who tries them.
So grab your ingredients, roll up your sleeves, and get ready to create a treat that’s as fun to make as it is to eat. Don’t be surprised if these become a new family favorite—you might want to make a double batch! Enjoy!